Home | Projects | Notes > Embedded Linux > Booting BBB over Serial Port
Booting BBB over Serial Port
[!] Note: The "Exercise" section leads to some errors. e.g., After loading U-boot image, cannot get into U-boot prompt.
Serial Booting
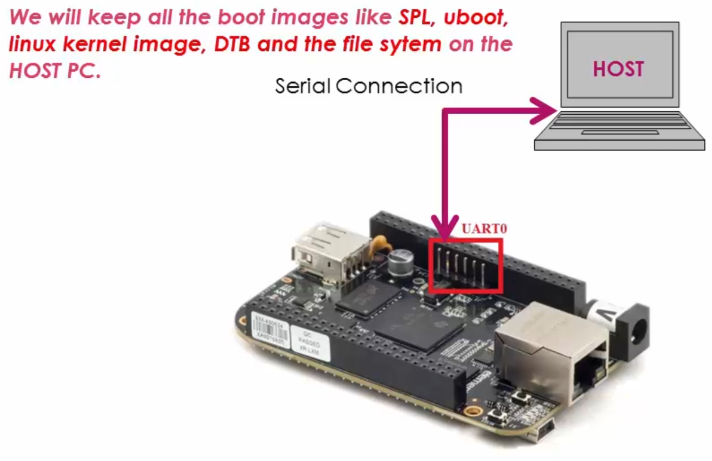
Serial booting means transferring the boot images from host to the target via the serial port (UART) in order to boot the target board.

[!] Note: Host may be running on Windows, Linux or Mac because most of the serial monitoring programs support Xmodem, Ymodem, and Zmodem protocols.
The protocol used to transfer a file/information over UART:
Xmodem, Ymodem, Zmodem, Kermit, etc.
[!] Note: The protocol used to transfer a file/information over IP network:
TFTP, HTTP, FTP, SMTP, etc.
Mechanism of Serial Booting
First of all, make the BBB board to boot via UART peripheral.
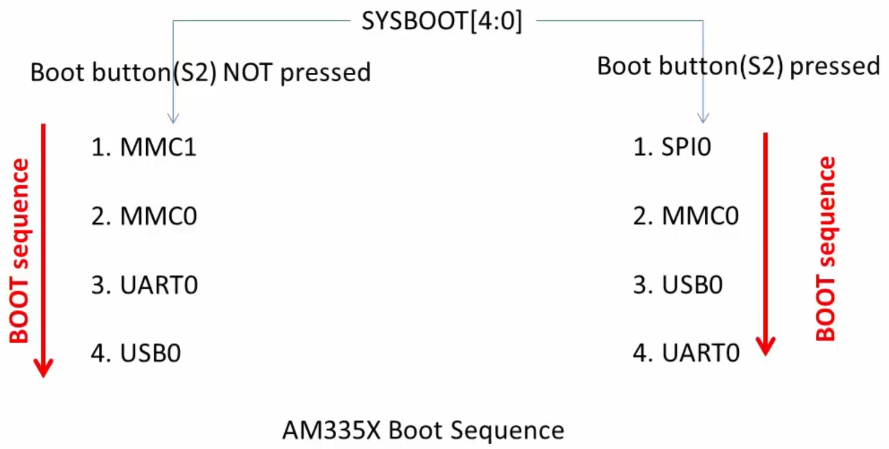
Boot the board exactly the same way you've booted using the micro SD card except that this time the micro SD card is NOT inserted to the board. (Press and hold S2 button
Make sure the SD card slot is empty.
Make sure the mini USB cable is NOT connected to the board.
This is so the board does not boot from the port P4; USB0. Even if the board cannot detect the boot source over the connected USB, it will wait about 4.5 mins to move on to the next boot source. So, try to power the board using power adapter not the mini USB cable. (Consult the figure "USB Initialization Procedure" of the Technical Reference Manuel.)
Power up the board using the power adapter.
Then, the board will boot over UART0.

When you keep the board in the UART boot mode, the ROM Boot Loader (RBL) is waiting for the second stage boot loader that is SPL image over Xmodem protocol only!
The ROM code will ping the host 10 times in 3s to start Xmodem transfer. If host does not respond, UART boot will timeout.
Once the SPL executes it also tries to get the third stage boot loader that is U-boot image over Xmodem protocol, and you should send the U-boot image over Xmodem protocol from the host.
When the U-boot executes, you can use U-boot commands such as
xmodemorymodemto load the rest of the images like the Linux kernel image, DTB, initramfs into the DDR memory of the board at the recommended addresses.Recommended addresses:
Binary DDR RAM Load Address Linux kernel image (uImage) 0x82000000 FDT or DTB 0x88000000 RAMDISK or INITRAMFS 0x88080000 https://stackoverflow.com/questions/45475611/zimage-loadaddr-in-uboot
Summary
Make the board slip into the UART boot mode.
Once in the UART boot mode, the ROM Boot Loader will be waiting to receive the SPL over UART via Xmodem protocol, so send SPL form the host PC first.
Then, SPL executes on the board and it will be waiting to receive the U-boot image. Send the U-boot image.
When getting the control of U-boot on the board, use U-boot commands
xmodemandymodemprotocol to download all the other boot images onto the DDR memory of the board, and then the booting will further proceed from there.
[!] Note: If you are facing issues with U-boot boot after downloading it through Xmodem, then refer to the following threads where TI Software team suggests to use Ymodem protocol to download the uboot image instead of Xmodem.
https://e2e.ti.com/support/arm/sitara_arm/f/791/t/646278?AM3358-UART-boot-mode
https://e2e.ti.com/support/arm/sitara_arm/f/791/t/646278?AM3358-UART-boot-mode
Exercise
Open minicom.
Put the board into UART boot mode - Press and hold the boot button (S2) and then press and release the power button (S3).
Transfer the first boot image; SPL using xmodem.
Transfer protocol options: xmodem, ymodem, zmodem, kermit
u-boot-spl.bin)You've just finished sending SPL to the internal RAM of the SoC.
Now, UART is looking for the U-boot image.
Before the board times out, transfer U-boot image (
u-boot-img) using ymodem.You've just finished downloading the U-boot image to the DDR memory of the BBB board.
[!] Note: Mine worked after ignoring a number of timeout messages. I don't know what happened during the process. But, if you end up not entering the U-boot prompt properly, redo from Step 3, using
MLO, andu-boot-imgin the following link: https://github.com/emagii/training-materials/tree/master/lab-data/linux/bootloader/beaglebone-blackLoad the Linux kernel image using U-boot command.
xxxxxxxxxx21=> loadx 0x820000002## Ready for binary (xmodem) download to 0x82000000 at 115200 bps...0x82000000 comes from the "recommended address" table above in the notes.
U-boot will now download the binary image or any file using x-modem protocol at this location in the DDR RAM of the board.
uImag.Transfer takes about 5-10 mins (4 MB). When finished, you'll see the following additional info printed.
xxxxxxxxxx31CCACHE: Misaligned operation at range [82000000, 8241c660]2## Total Size = 0x0041c660 = 4310624 Bytes3=>Load Device Tree Binary (DTB)
xxxxxxxxxx21=> loadx 0x820000002## Ready for binary (xmodem) download to 0x82000000 at 115200 bps...Select the DTB file...
xxxxxxxxxx31CCACHE: Misaligned operation at range [82000000, 82005f6c]2## Total Size = 0x00005f6c = 24428 Bytes3=>Load initramfs
xxxxxxxxxx21=> loadx 0x880800002## Ready for binary (xmodem) download to 0x88080000 at 115200 bps...Select the initramfs file... (It will take around 5 - 10 mins)
xxxxxxxxxx21CCCACHE: Misaligned operation at range [88080000, 88374b36]2## Total Size = 0x002f4b36 = 3099446 BytesNow, we are almost ready to boot the Linux kernel from memory.
Since we are using RAM based file system, we have to tell this info to the Linux kernel using the boot arguments. Otherwise, Linux kernel will not know where to find the file system to mount during its booting process and the boot may fail.
xxxxxxxxxx11=> setenv bootargs console=ttyO0,115200 root=/dev/ram0 rw initrd=0x88080000console=ttyO0,115200- Console and baudrate inforoot=/dev/ram0 rw- RAMFS device fileinitrd=0x88080000- initramfs address in memoryBoot the Linux kernel from memory
xxxxxxxxxx21bootm ${kernel_load_address} ${initramfs_load_address} ${dtb_load_address}2=> bootm 0x82000000 0x88080000 0x88000000This should boot the Linux kernel successfully. Mine showed some errors!
References
Nayak, K. (2022). Embedded Linux Step by Step Using Beaglebone Black [Video file]. Retrieved from https://www.udemy.com/course/embedded-linux-step-by-step-using-beaglebone/